Customer Knowledge Base
Helpful Information for Title Companies, Real Estate Agents, and Homebuyers
Select the option below that best describes your role in the homebuying process.
Registering for Tidal Money: In order to register for Tidal Money, your title company must have a signed contract in place. This will allow onboarding to begin. If you're interested in using Tidal Money, contact us here!
Creating User Accounts: Users allows you to create user accounts and assign permissions for those users. You will also be able to associate the user with locations and teams.
To create a user, follow the steps below:
- Enter the user's first and last name.
- Enter the user's email address.
- Enter the ID* for the user from your title production software.
- Assign relevant permissions for the user.
- If associating location(s), click Add Location and select the location(s).
- If associating team(s), click Add Teams and select the team(s).
- Click Save.
When a new user is created, an email will be sent to the user notifying them that a Tidal Money account has been created and requires their authentication. Once the account has been authenticated, the new user will be able to create a password in order to complete the registration process. If the user does not complete the registration process, the invitation email can be resent by clicking the Actions menu and selecting Resend Invite.
*The title software ID is required as this is used as part of our integration ensure that the correct users is being entered into the file as the Escrow Officer.
Creating Locations: Locations are ways to organize your branches/offices within Tidal Money. It also drives various business rules with the Request for Funds form and property files. You'll have the ability to create associations to Funding Accounts, Teams, and Users.
To create a Location, follow the steps below:
- Click New.
- Enter the name of the location.
- Enter the location address*.
- If associating funding account(s), click Add Funding Account and select the funding account(s).
- If associating team(s), click Add Teams and select the team(s).
- If associating users, click Add Users and select the users.
- Click Save.
When a location is selected during funding approval, it will automatically default the Teams drop-down. If more than one Team exists for the Location, it will populate all Teams. However, please note the first Team located will be populated first. This may need to be changed prior to funding approval. When a Team is added to a location, all users for that Team will populate the User section. Users can be added to a location even if they are not part of any Teams associated with that location. For example, if you would like the receptionist for the location to be added, they can be added as a User without being added to the team.
*Please be sure to enter a complete address as this information will be used to pre-populate the location information on emails sent from Tidal Money regarding the submitting or receiving of funds.
Creating Teams: Teams allow you to organize users within Tidal Money. A Team consists of a single Team Lead and a set of users. Think of the Team Lead as the Escrow Officer and the Users as Escrow Assistants. A Team is used in various business logic for the Earnest Money Payments such as deriving the funding account for the payment and in order to notify team members when new requests are submitted. You can also associate Funding Accounts and Locations within Teams.
To create a Team, follow the steps below:
- Click New.
- Enter the Team Name.
- Select the Team Lead from all available users for your company.
- If associating Funding Account(s)*, click Add Funding Account and select the funding account(s).
- If associating Location(s), click Add Location and select the location(s).
- If associating Users, click Add Users and select the users.
- Click Save.
Team Leads must be unique across all Teams. Once a user is selected as a Team Lead, they will no longer be available to be selected on any additional Teams.
When an earnest money request is submitted, the Escrow Officer field on the form is populated from all available Team Leads for that Title Company. The Funding Account associated with the Team for that Team Lead is used when processing the earnest money payment.
*Only one funding account can be associated with a team at any given time.
Funding Accounts: A Funding Account is the Tidal Money equivalent of a Trust Account. We require the banking information to be entered into Tidal Money so that we complete the banking transactions associated with earnest money payments or closing disbursements. Access to Funding Accounts is determined by the user permissions assigned when each user is created.
Below are the steps for creating a Funding Account:
- Click New.
- Enter your name for the Funding Account.
- Enter the name of the financial institution.
- Enter the name on the account.
- Enter the routing number.
- Enter the account number and confirm it. If the account numbers do not match, an error will occur
- Enter any payment instructions that a payee may need in the Secure Payment Instructions.
- Click Save.
The steps above can be repeated for as many Funding Accounts that are needed. If you need to edit a Funding Account, either click on the row or select the Edit option in the Actions column. Make any updates and then save your changes. Any changes made will not affect previously closed Property Files or paid Request for Funds. However, if the Funding Account is associated with an active payment or disbursement, you will not be able to make changes until the banking transactions have been completed.
Submitting a Request for Funds: Any type of user may submit a request for Earnest Money as long as a Purchase and Sale Agreement (PSA) has been executed. After the request has been submitted, the different user types have specific tasks which need to be accomplished before the banking transaction can be completed. To submit a fund request for earnest money, follow the steps outlined below:
- From the Funding Request page, click on the New button.
- Drag and drop or upload a PDF of the executed PSA.
- Complete all the required information on the form.
- Verify the information being submitted is correct.
- Click the Submit button to submit the request.
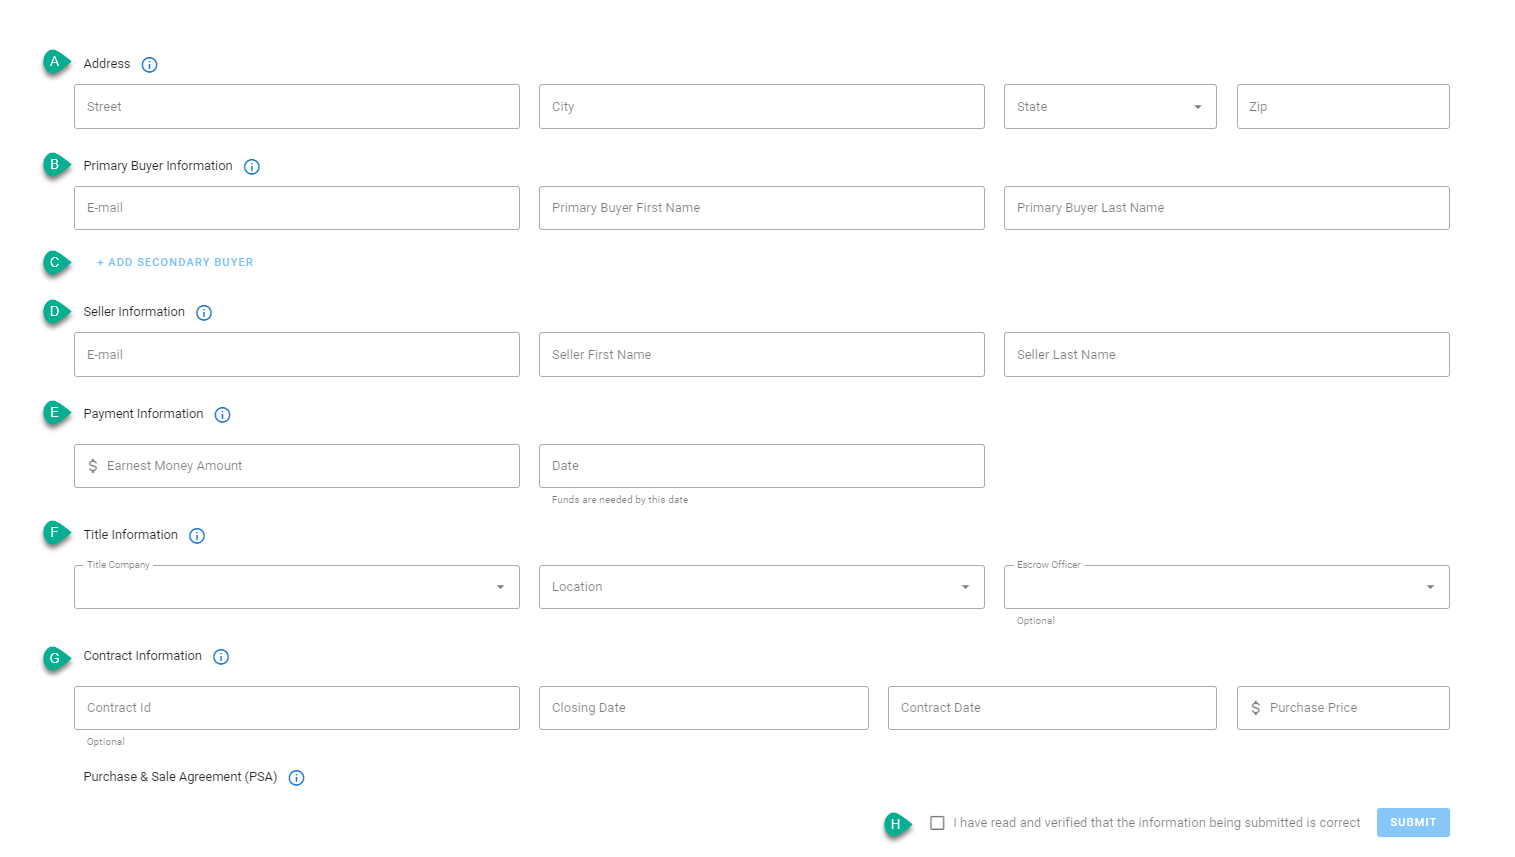
Funding Request Form and Helpful Hints

- Address refers to the address of the property being sold.
- Primary Buyer Information is the name and email address of the person purchasing the property.
- Add Secondary Buyer is an optional field and can be used if there is a secondary person purchasing the property.
- Seller Information is the name and email address of the person selling the property.
- Payment Information refers to the amount of Earnest Money being requested and the date that the earnest money is due to the title company.
- Title Information is the name and location of the title company, as well as the Escrow Officer handling the purchase of the property.
- Contract Information is information pertaining to the sale of the property. The Contract ID is an optional field.
- The confirmation that the information being submitted is correct and must be checked in order to submit the form.
Reviewing a Fund Request: Once a funding request has been submitted, Title Agents are required to review the request. Once reviewed, the Title Agent can approve, reject, or void the request. Action on the request must be taken before the buyer is able to proceed with payment.
- Approving a funding request confirms that information in the request is accurate and initiates the notification to the buyer about the pending earnest money payment.
- Rejecting a funding request sends the request back to the person who submitted it.
- Voiding a fund request cancels the request and no notification will be sent to the buyer. This would normally occur if the purchase of the property falls through before the earnest money is due.
To review a Fund Request, locate the request on the Funding Request page and click the row to view the details.
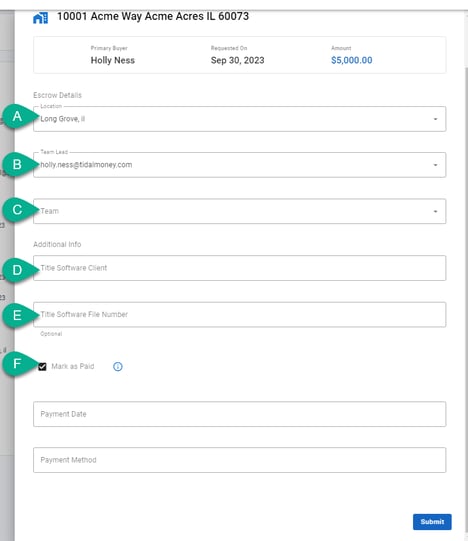
Approving a Fund Request: To approve a fund request, click on the Approve button at the bottom of the Funding Request details. Once clicked, you will see the various Escrow details that are needed to create or update a file in the title software. If the fields existed in the funding request form, they will be pre-populated but are editable if needed.

- The Location of the Title Office where the closing will take place.
- The Team Lead is the Escrow Officer for the closing.
- The Escrow Team associated with the closing.
- Title Software Client is the equivalent of the Client field in your title software. This is a required field and you will need to select one of the available items in the drop-down.
- Underwriter corresponds to the Underwriter fields in your title software. Select the Underwriter for the file from the available options.
- Title Software Number should only be filled in if a file was already started for this property sale in the Title Software system.
- Mark as Paid provides an option to enter payment details for the request when it is approved. If this box is checked, then two additional payment fields will be rendered to enter the payment information.
Once all the required information is present for the approval, click Submit. This will trigger a notification email to the buyer for the earnest money payment.
Rejecting a Funding Request: Funding Requests are typically rejected if there is something incorrect in the request. To reject a funding request, click on the Reject button on the funding request details. Once clicked, enter the reason for the request being rejected and click Submit. Rejecting a funding request will send an email notification to the person who submitted the request. The buyer will not be notified that the request was rejected or of any pending earnest money payment.
Voiding a Funding Request: To void a funding request, click on the icon with the three dots at the bottom of the request details and select Void. Once the void request is confirmed, the funding request is considered cancelled.
Requesting Earnest Money: As long as a Purchase & Sale Agreement (PSA) has been executed, you can submit a request for funds from your buyer. We recommend working with your chosen title company to ensure activities aren't duplicated. Please keep in mind that the title company will have to approve the funding request before the buyer can submit their payment.
Submitting a Request for Funds: To submit a request for funds, follow the steps below:
- From the Funding Request page. click on the New button.
- Drag & drop, or upload a PDF of the executed PSA.
- Complete all the required information on the form.
- Verify that the information being submitted is correct.
- Click the Submit button to submit the request.
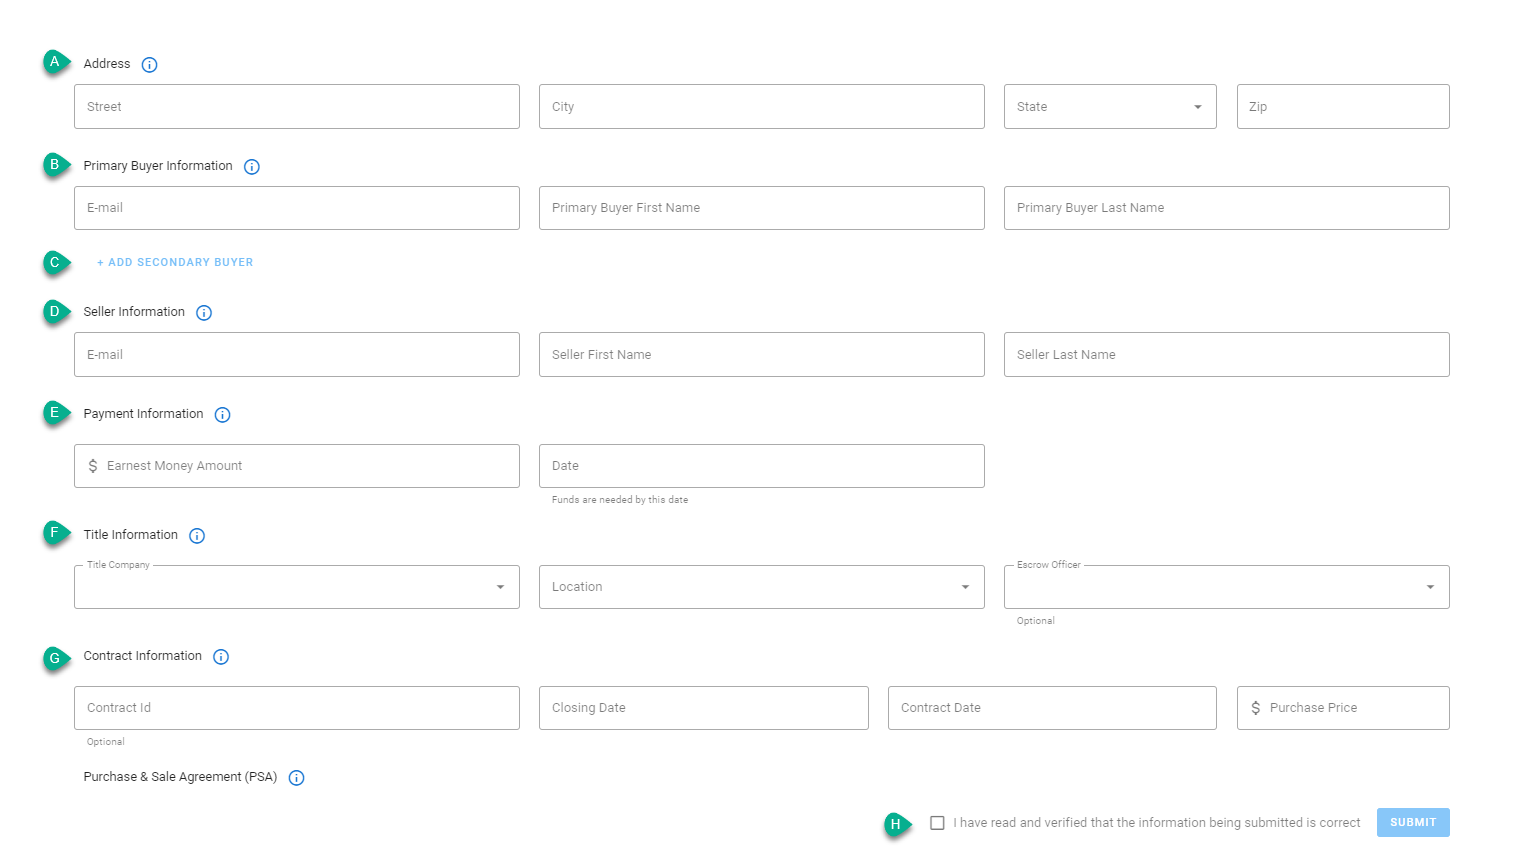
Funding Request Form Helpful Hints
- Refers to the address of the property being sold/purchased.
- Name and email address of the person purchasing the property.
- This is an optional field and can be used if there is a secondary person purchasing the property.
- Name and email address of the person selling the property.
- Refers to the amount of earnest money being requested and the date that the payment is due to the title company.
- Name and location of the title company, as well as the escrow officer handling the purchase of the property.
- Information pertaining to the sale of the property. Please note, Contract ID is an optional field.
- The confirmation that the information being submitted is correct and must be checked in order to submit the form.
Looking for an easy how-to guide to share with your clients? We've got you covered. Download our Earnest Money Payment Guide here!
Submitting Your Earnest Money Payment: Once the title company is ready to receive your earnest money, you will receive a secure email instructing you to visit Tidal Money to submit your payment. You will be able to see who will be receiving the payment, the amount of earnest money requested, and the due date for the payment.
To submit a payment, follow the steps below:
- From the payments page, review the payment details to ensure the requested amount is correct.
- Click the Pay button.
- Select the payment method for the transaction.
- You can select a stored payment method if available; otherwise, choose One-Time Payment.
- Enter your banking information if you selected one-time payment.
- Click Submit.
The following payment types are available for earnest money payments:
- Automated Clearing House (ACH): This method will automatically debit the money from your account and transfer it to the title company. This process can take between 3-5 business days.
- Wire Transfer: For security reasons, wire transfers cannot be automated via our application. If wire transfer is the method you prefer, it will need to be initiated via your financial institution. Please note, there may be additional fees applied depending on the financial institution.
- Instant Payment: Instant payment automatically debits the earnest money from your account and transfers to the title company's bank account. However, this method must be pre-approved within your banking app before the transaction can occur.
- Check: If you decide to make your earnest money payment via check, the check should be dropped off at the location indicated.
Payment Confirmation: Once the banking transaction has been completed, the confirmation can be found in the Completed tab on the Payments page. A receipt will be available to download if needed. You will also receive an email notification once the payment has been processed.
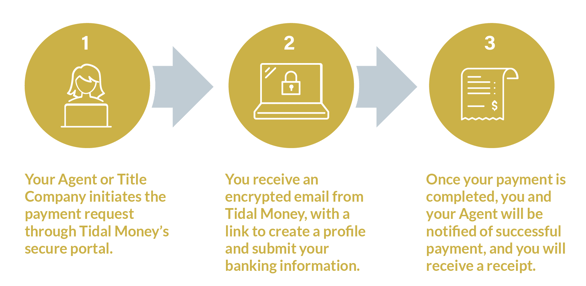
It's as easy as 1, 2, 3!

Reach out to our support team
We can help troubleshoot any issues you might be having and answer your questions if you can't find the answer above.

(208) 452-1616

Support@TidalMoney.com

6905 US HWY 95 Fruitland, ID 83619
